Installing MAMP for Mac and Setting Up Virtual Hosts
By B Lingafelter testserver, workflow
This guide contains installation and configuration instructions for MAMP on Mac.
Installation and Configuration Instructions:
- Head to the MAMP website and download the current version of MAMP (3.5 as of Jan, 2016).
- To run the installer, double-click the MAMP_MAMP_Pro_3.5.pkg file.
- Accept all suggested defaults and click Agree when license agreement is displayed.
- Click the Install button, enter your Mac Administrator password, and click OK. Note: Administrator permission is also required to start/stop the Apache and MySQL servers.
- When installation is finished, open the MAMP Control Widget (Applications > MAMP folder).
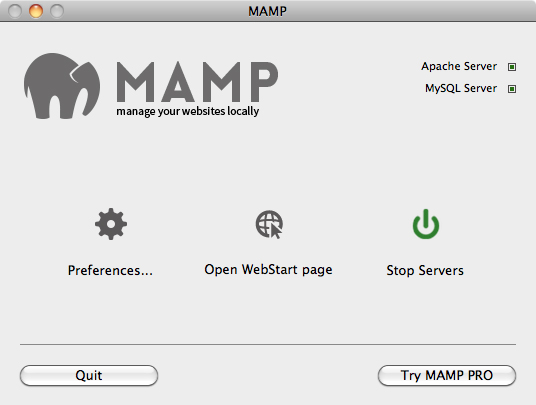
- Click Start Servers to start Apache and MySQL servers. You will be prompted to enter your Mac administrator's password, which is normal when starting or stopping servers.
- Click Stop Servers to stop Apache and MySQL servers.
- The default MAMP installation uses non-standard ports, because the Apache server that ships with Mac OS X is already configured to use port 80 (though it's not turned on by default). Because non-standard ports can be problematic, you should reset the Apache and MySQL Ports to standard default ports of 80 and 3306.
- In MAMP control panel, click Preferences.
- Select Ports tab (top) and click Set Web & MySQL ports to 80 & 3306. Set Nginx Port to 8080 (cannot be the same as Apache, which should be port 80).

- Click OK.
- Select PHP tab and choose PHP 5.6.2 (if necessary)
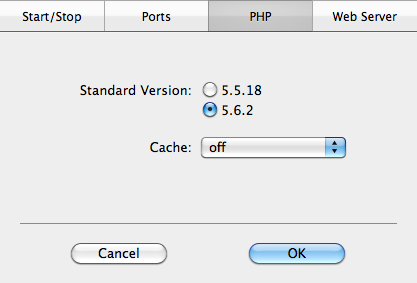
- Click OK.
- Before testing your installation, you should also check related System Preferences.
- Open System Preferences, and select Sharing (Internet & Wireless category). Note: Only on older versions. If you have a newer version like Yosemite and El Capitan, just skip this and File Sharing options in steps 16-19.
- Make sure that Web Sharing is not selected. Clear Web Sharing checkbox if marked.
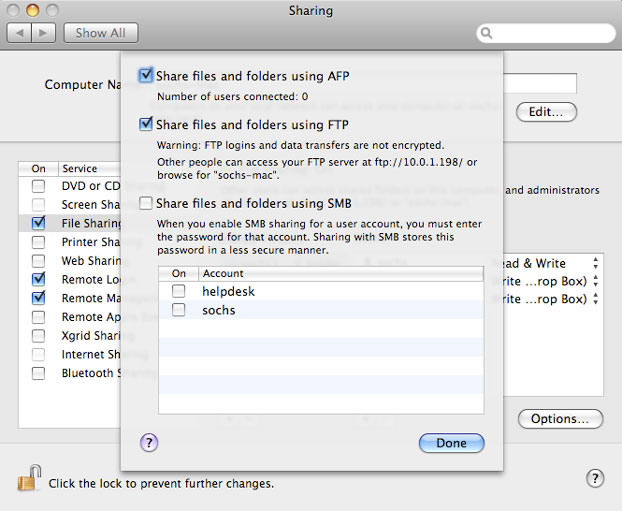
- Check File Sharing and click the Options button.
- Make sure Share files and folders using FTP is selected. FTP is generally considered the standard for editing websites remotely, and Dreamweaver uses FTP (and its more secure sibling, SFTP) to manage sites.
- Click Done and close System Preferences.
- Now, you're ready to test your PHP installation.
Test PHP
- In MAMP Control Panel, click Start Servers and enter your Mac administrator's password.
- Click Open Start Page.
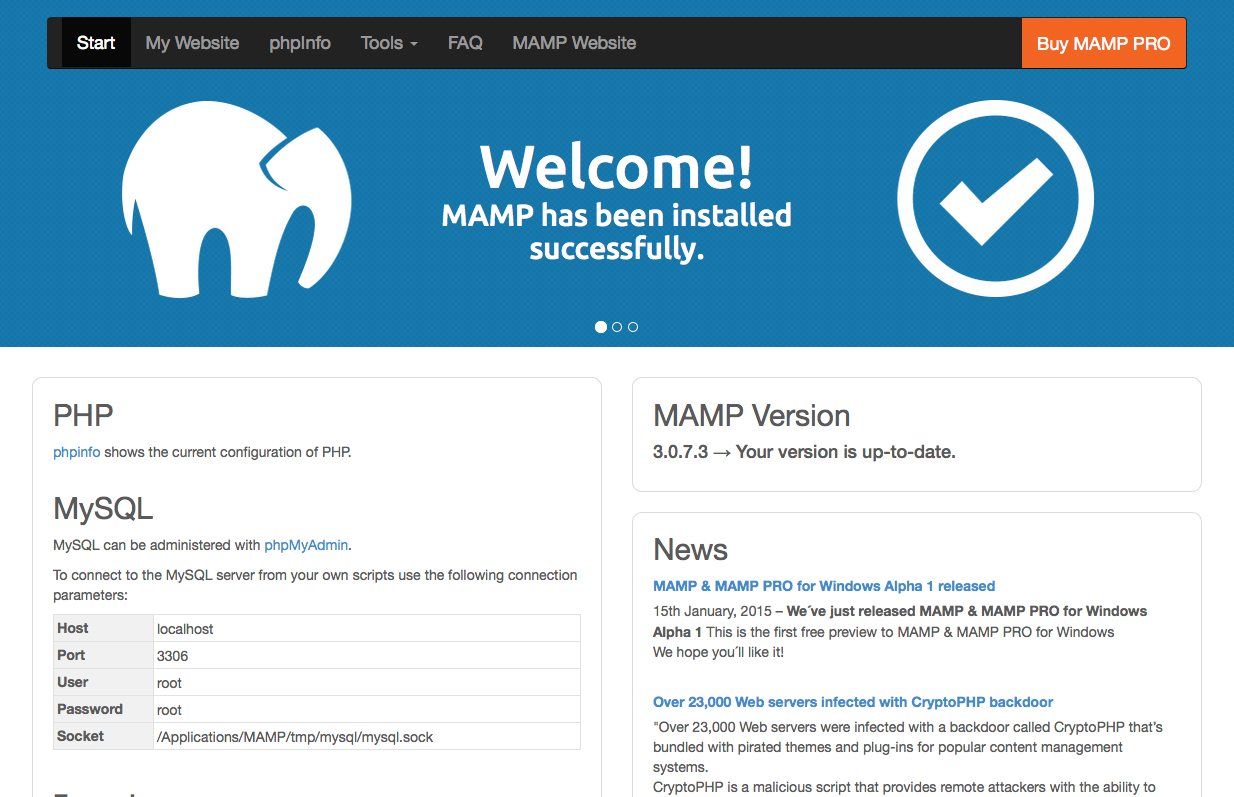
- When the start page opens in your default browser, click phpinfo link (or click phpinfo tab).
- Scroll down to the Core section and compare your values with those in Configuring PHP so you'll know what directives you need to change in your php.ini file.
- When ready to edit your php.ini file, be sure to Stop Servers (MAMP Control Panel). Refer to Modify php.ini for MAMP (Mac) for details on editing the php.ini file before you setup your virtual hosts.
Setup Virtual Hosts on MAMP
Creating a Virtual Host is a 2-step process:
- Add a new entry to your computer's hosts file that specifies the local domain name of each site on your local computer.
- Edit the Apache configuration file to register each Virtual Host in the web server (one for each site you want to test locally on your computer).
Create Virtual Host folders
- Open Finder and navigate to
/Users/your_username/Sites/Note: El Capitan and possibly Yosemite do not ship with a Sites directory. If you don't already have one, create a Sites directory in your home directory. - Inside the Sites folder, create two subfolders: in234 and project.
- The in234 folder will hold tutorial files, and the project folder will hold your homework projects.
Edit hosts file
Be sure you have stopped your servers before proceeding.
IMPORTANT: To open the hidden hosts file in TextWrangler, choose File > Open. Set the Enable option to Everything and mark the hidden files checkbox in Open dialog box, then navigate to /private/etc/hosts. If you can't find it, choose File > Open File by Name. Type private/etc/hosts in search box, select the file found and click Open.
- Add the names of the your two virtual hosts as follows:
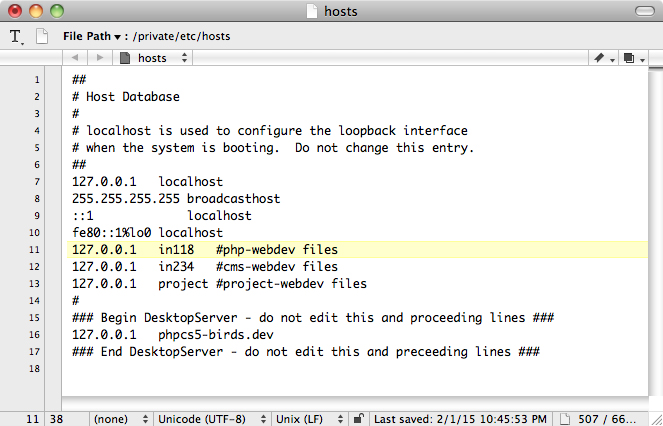
- Save and close the file. You will need to enter your administrator's password to confirm the changes.
Edit httpd.conf and httpd-vhosts.conf files
- Open the Applications/MAMP/conf/apache/httpd.conf file in TextWrangler.
- To turn on virtual hosts, enable the Include httpd-vhosts directive. Scroll to line 570 and delete the # (hash symbol) at beginning of this line to remove the comment:
Include /Applications/MAMP/conf/apache/extra/httpd-vhosts.conf - Save and close the file.
- In TextWrangler, open the Applications/MAMP/conf/apache/extra/httpd-vhosts.conf file.
- Scroll to line 19 and examine the following line:
NameVirtualHost *:80 - Delete the # (hash symbol) at the beginning of the line if necessary.
- Create <VirtualHost> blocks for the localhost and your two virtual hosts as follows:
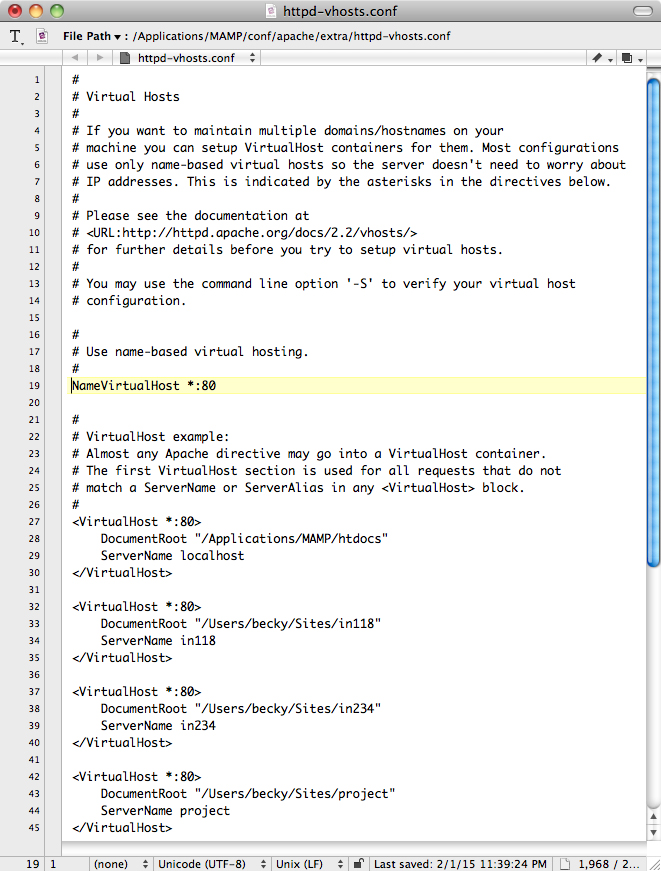
- Save and close the httpd-vhosts.conf file.
Test Virtual Hosts
- Open the MAMP Control Panel.
- Click Start Servers and enter your Mac administrator's password.
- Click Open start page. If your changes were made correctly, the MAMP start page will open in your default browser.
- To test one of the virtual hosts, type http://in234/site_check.php in address bar of a browser. If the resulting page returns the current time, the virtual host is working correctly.
- In the MAMP Control Panel, click Stop Servers and enter your Mac administrator's password.
- Click Quit to close the MAMP Control Panel.
- That's it! You're ready to start working on a project.
Resources:
Web Server and Related File Locations:
- Document root:
Macintosh HD:Applications:MAMP:htdocs - PHP Configuration (php.ini) file:
/Applications/MAMP/bin/php/php5.4.4/conf/php.ini - Unlock and edit these three files:
- hosts (hidden):
Macintosh HD:private:etc:hosts - httpd.conf:
Applications:MAMP:conf:apache:httpd.conf - httpd-vhosts.conf:
Applications:MAMP:conf:apache:extra:httpd-vhosts.conf
- hosts (hidden):
- Virtual host folders:
/Users/your_username/Sites/your_site_folder/
Installation Resources:
- Adobe Developer Connection article by David Powers http://www.adobe.com/devnet/dreamweaver/articles/setup_php.html#articlecontentAdobe_text_10
- Installing MAMP video at http://www.youtube.com/watch?v=WAZ5SmJd (David Sawyer McFarland, author of Dreamweaver Missing Manuals) - Doesn't cover virtual hosts, but includes setting ports and other helpful information
- Creating a virtual host in MAMP by David Powers http://foundationphp.com/tutorials/vhosts_mamp.php - Note: Avoid the Creating a virtual host in Mac OS X 10.5 (Leopard) tutorial as it's written for the default Apache installation included on Macs rather than MAMP.
- Check out http://www.mamp.info/en/documentation/index.html for MAMP Only installation image and MAMP documentation (there's even a Users Guide in PDF)
- MAMP Documentation is at http://documentation.mamp.info/en/mamp. For official MAMP forum, go to http://forum.mamp.info/viewforum.php?f=21.
- How to Install MAMP and WordPress on OS X http://www.macappguide.com/2009/07/22/mag-22-how-to-install-mamp-wordpress-on-os-x/ and Troubleshooting MAMP and WordPress http://www.macappguide.com/mamp/
Other Related Resources:
- XAMPP for Mac OS X http://www.apachefriends.org/en/xampp-macosx.html
- DesktopServer Limited (Free - Win and Mac) http://serverpress.com/downloads/ - Like XAMPP and MAMP and also includes WordPress
- Bitnami WordPress Stack http://bitnami.org/stack/wordpress - Download Native installer for your operating system (Win or Mac)
Troubleshooting MAMP PRO Database:
To access a database created with MAMP after your MAMP Pro trial expires:
- Stop servers first!
- Copy your MAMP PRO database files to the MAMP database folder. Make Backups! Just copy, don't move!
- MAMP is using this mysql database:
/Applications/MAMP/db/mysql - MAMP PRO 1.7.2 is using this database:
/Library/Application Support/living-e/MAMP PRO/db/mysqlor this database:/Library/Application Support/appsolute/MAMP PRO/db/mysql