Virtual Hosts Setup with XAMPP (Windows)
By B Lingafelter testserver, workflow
The default test server setup allows for only one website. When you need to develop/maintain multiple sites, you can take a simple approach and create each new site in a subfolder of the server's root (htdocs). But that approach prevents use of site root relative links, which are required when a site uses PHP includes. (Site root links always begin with a forward slash which represents the root folder, and is followed by the full path to the file). Creating a virtual host for each site is a much better approach even though it takes a few more steps to set up. In addition to use of site root links, this also provides a unique local domain for each site. In case you wondered, this is how hosting companies manage shared hosting.
Creating a Virtual Host is a 2-step process:
- Add a new entry to your computer's hosts file that specifies the local domain name of each site on your local computer.
- Edit the Apache configuration file to register each Virtual Host in the web server (one for each site you want to test locally on your computer).
Create Virtual Host folders
While a virtual host can point to any folder on any drive of your system, it's generally easier to manage if you store all your sites in a common location. In this case, we'll store all our site folders in a vhosts folder on the system drive.
- Create a vhosts folder on your system drive (C:\vhosts) or other physical drive of choice on your system. (I use E:\vhosts as I never store my data on the system drive.)
NOTE: While it's possible to create a vhosts folder on a removable (flash) drive to store your websites, I don't recommend it for several reasons. When the drive letter changes your virtual hosts won't work. And the slower speed of removable drives will compromise performance, sometimes drastically. - Inside the vhosts folder, create a subfolder for each dynamic website. For the IN234 class, create a in234 subfolder. This is the folder where you will install WordPress later.
Edit the hosts file
- Be sure to stop both Apache and MySQL servers before proceeding.
- Launch Notepad and open the C:\windows\system32\drivers\etc\hosts file.
IMPORTANT: This is a system file, so you must first open Notepad with Administrative privledges - Right-click on Notepad in Start menu, choose Run as Administrator, then use File > Open to open the file. (Due to Windows security, using other Text Editors like Notepad++ is not recommended as you will be unable to view the etc folder.) - At the bottom of your hosts file, locate the line that matches line 20 in the figure below. It should contain the following:
127.0.0.1 localhost - If there is a # (comment) at the beginning of line 20, delete the # to remove the comment.
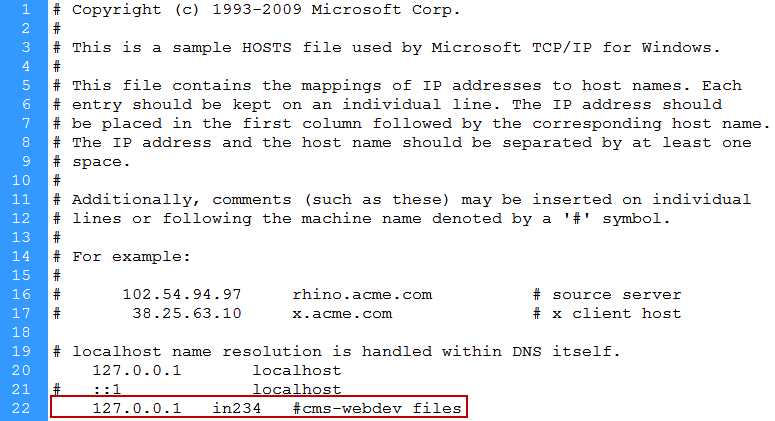
- Be careful not to remove the # from the line that matches line 21 in the above screen shot. This line must be ignored.
- Add the following line at the end of the file:
127.0.0.1 in234 #cms-webdev filesNote: For each additional subfolder you added to the hosts file, add a corresponding virtual host on a separate line and point it to the same 127.0.0.1 localhost IP address.
- Save and close the hosts file.
Edit httpd-vhosts.conf file
- In Notepad++ (or other Text Editor with line numbering), open the C:\xampp\apache\conf\extra\httpd-vhosts.conf file.
- Find the location in your httpd-vhosts.conf file that's shown on lines 16-19 in the screen shot below. In the blank space enter the following:
<Directory C:/vhosts>This sets the correct permissions for the root folder that contains all the sites you want to treat as virtual hosts. Be sure to use forward slashes and surround the pathname in quotes if it contains spaces.
AllowOverride All
Require all granted
</Directory>

- Find the line in your file that matches line 23 in the screen shot above. Enter ## at the beginning of the line to comment it out, as it's no longer necessary with Apache 2.4.
- At the bottom of your httpd-vhosts.conf file, create a <VirtualHost> block for your website, as shown below and on lines 35-38 in the screen shot.
<VirtualHost *:80>

            DocumentRoot "C:/vhosts/in234/"

            ServerName in234

</VirtualHost> - Notes about <VirtualHost> blocks:
- Quotes are optional for pathnames that do not include spaces, as are ending slashes;
- Lines 30-33 shown above, identify your localhost. You must have this <VirtualHost> block.
- Be sure to add an additional <VirtualHost> block at the bottom of the file for each virtual host you will need. Lines 35-38 shown above identify your in234 virtual host.
- You may have additional lines in your default <VirtualHost> block commented out with ## synbol. They are not necessary for testing so leave them as is, or delete them.
- Save the httpd-vhosts.conf file and close it.
- Before completing any tutorials, restart Apache and test your virtual hosts.
Test Virtual Hosts
- Open the XAMPP Control Panel. If you don't have a Desktop or Quick Launch icon, go to Start > All Programs > XAMPP > XAMPP Control Panel.
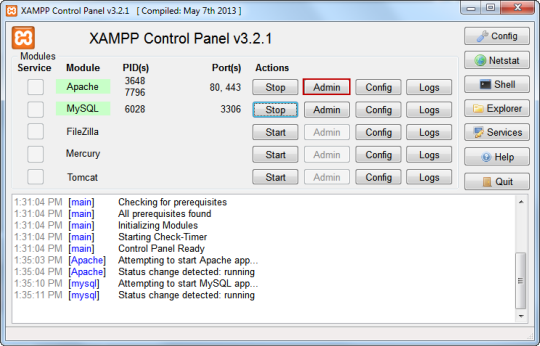
- Click Start button next to Apache to restart the server.
- Click the Admin button next to Apache (or type http://localhost in address bar of a browser). If your changes were made correctly, the XAMPP for Windows page will appear.
- To test your virtual host, create the following in a text editor and save it as site-check.php in the C:\vhosts\in234 folder.
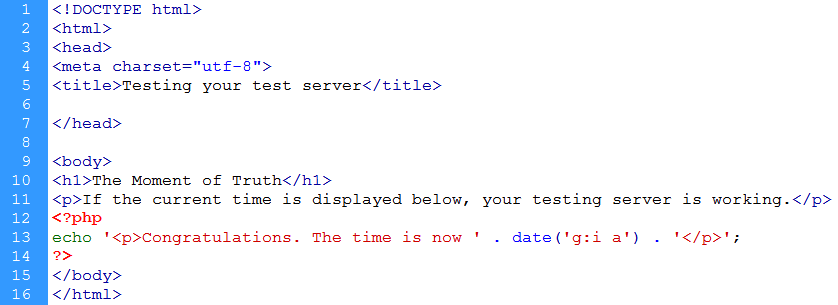
- Then type http://in234/site-check.php in address bar of a browser. If the resulting page returns the current time, the virtual host is working correctly.
- Stop both Apache and MySQL servers.
- Click Quit to close the XAMPP Control Panel.